Replacing a Bridge P-90 Pickup With a Humbucker in Epiphone Les Paul Special — Routing 101 | DIY
I’ll demonstrate by converting part of a new guitar into sawdust and noise, then transforming the instrument by installing a totally new pickup in the bridge position—so we can retain the natural flavor of the P-90 in the neck, but goose up the bridge position with a humbucker. And to make things even easier, there is a video of me doing this mod online at premierguitar.com, which I highly recommend watching. In it, I explain every step in great detail.
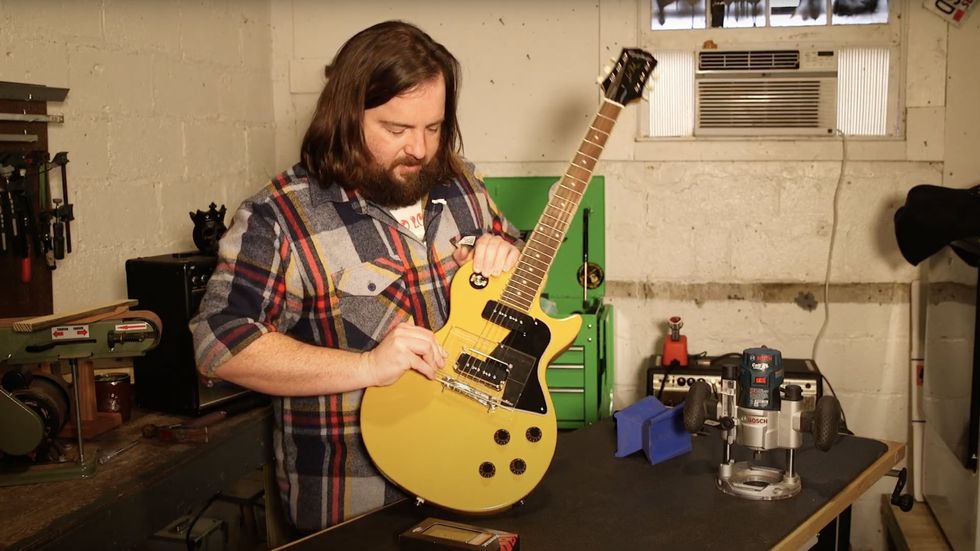
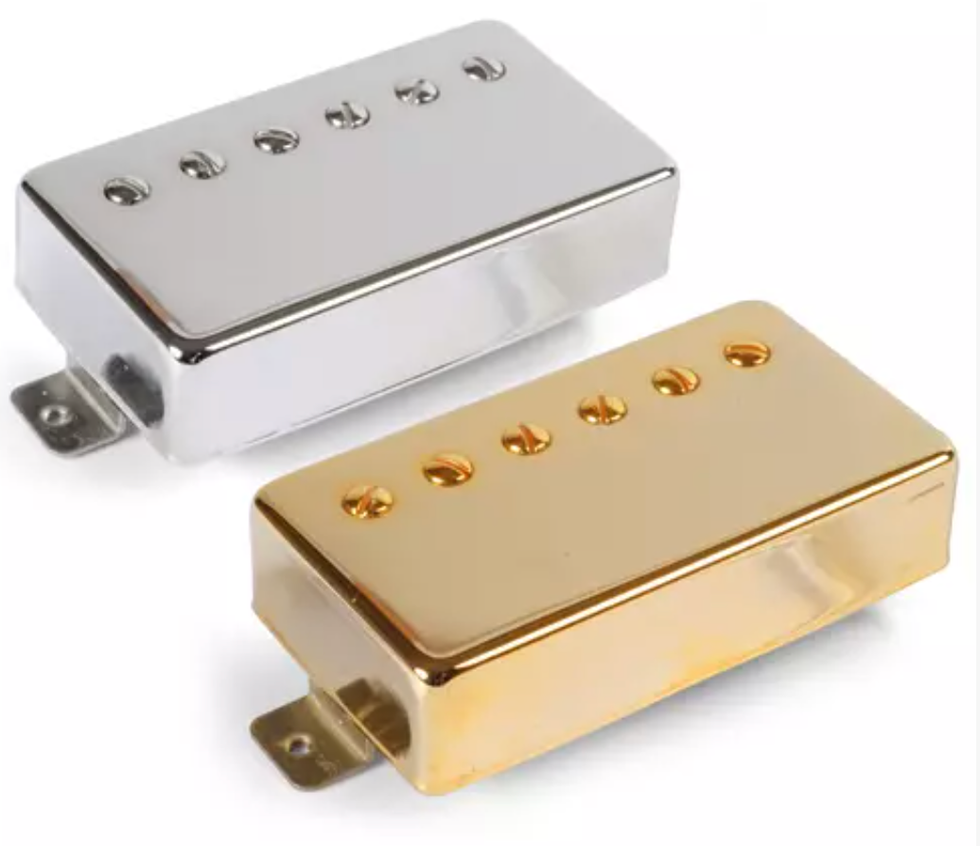
The guitar is a brand-new Epiphone Les Paul Special finished in glossy TV yellow—in my opinion, the best furniture finish ever commandeered for broadcast purposes—loaded with two P-90 pickups, black plastics, and chrome hardware. The pickup going into this guitar is a Parsons Street Humbucker by StewMac. Designed to emulate a popular variation of the traditional PAF-style humbucker, this medium-output pickup should retain plenty of treble clarity. It will mount to the guitar with a classic black humbucker mounting ring.
What You’ll Need for This Mod
Besides a guitar, a small bandsaw for cutting the pickguard, and painter’s tape, you can pick up everything you need for this modification project online at StewMac.com.
• Bosch Colt 1 HP Variable-Speed Palm Router
• Bosch Plunge Base for Palm Router
• Parsons Street Humbucker
• Fisch Wave Cutter Bit 5/8"
• Amana Tool Carbide Tipper Router Bit 1/4"
• Humbucker Pickup Routing Template

This is what our project guitar looked like before it hit the workbench.
Since we are on the topic of pickups, I’d like to note that the acronym PAF does not define a specific sound or a strict recipe for pickup making. It is simply a description of a design—Patent Applied For. Both P-90s and PAF-style humbuckers actually have a lot in common. If you examine their construction, it seems the goal for PAFs wasn’t necessarily a different-sounding pickup, just one that didn’t hum like its single-coil predecessors.
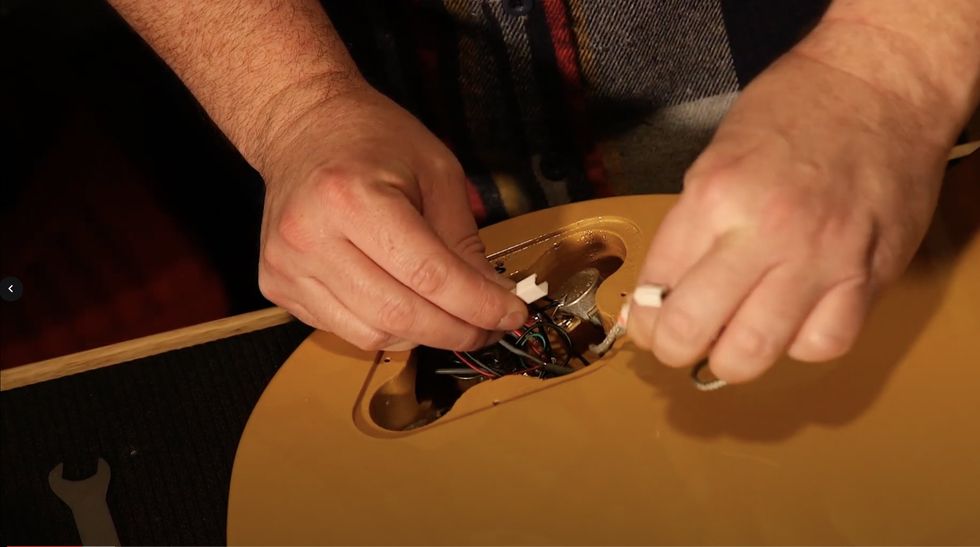
The OEM pickups in this Epiphone Les Paul Special are quick-connect, which makes for easy disassembling, but will require trimming the connectors and soldering as part of the humbucker’s installation.
As a result, a lot of the early Gibson ’buckers and P-90s have comparable output and not entirely dissimilar frequency response, depending on their magnets and how the coils were wound. These factors varied quite a bit for the first few years of production and produced some very different sounding pickups.
But, back to the bench, focusing on the task at hand.
Our author holds a StewMac humbucker-sized routing template over the pickup to be replaced.
This guitar is a good candidate for this kind of pickup swap for a few reasons: One, we only have to modify an existing pickup cavity; two, a medium-output bridge humbucker such as our Parsons Street should complement the sound of the neck P-90 nicely; and three, while the modification will be obvious, this new pickup will also complement the classic looks of the guitar.
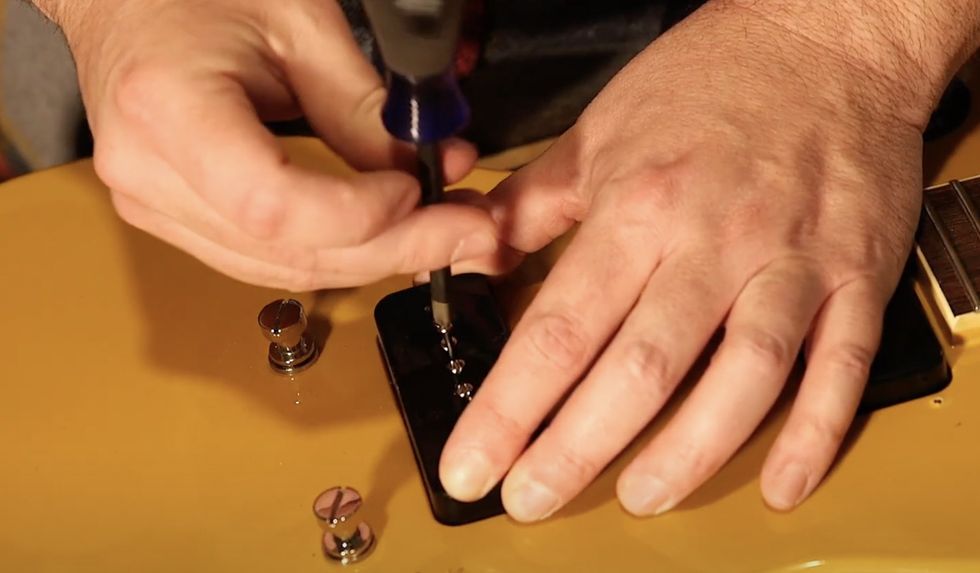
The pickups are mounted to the body via two easy-to-remove screws.
You may be here looking for inspiration as much as information—thinking about trying this modification yourself, but still not sure. Although it’s ultimately your decision, I can at least equip you with some arguments for and against.
Try the mod if:
• You are curious about how different pickups sound and you recognize the benefit of using the same guitar as a control in your experiment.
• You love everything about your guitar, but want a little more punch from the bridge pickup. This is common with single-coil pickers, Telecaster aficionados excluded.
• You might deem the guitar cooler this way. After all, it’s an uncommon but highly effective treatment for this model—which could make you want to play it more.
Don’t try this mod if:
• You have a more valuable, historic, or rare instrument.
• The resale value of the guitar matters to you.
• It’s not your guitar (LOL).
• Safety and preparation are not priorities.
Don’t Fear the Router
The part of this modification that scares most people off is working with a router. It’s an intimidating device and fear of it is understandable, considering what it can do to a guitar, or fingers, but learning about how it works and how to use it should, hopefully, alleviate your fear.
A router is a powered chisel that does what a standard chisel can do, good or bad … only faster. Positive or negative results depend entirely on the operator, just like any hand tool. And good results come from developing good technique and practice, which is one of the skills this mod aims at developing.
There is a wealth of information available about technique and a limit to the length of this article, so I’m only going to focus on a few basic tips that will help you get started safely:
• Only power the router on or off when the bit is able to turn freely, not in contact with any material.
• Do not move the router while the bit is accelerating or decelerating.
• Multiple shallow cuts are better than one deep cut.
• Pay attention to the router bit’s direction of rotation when planning the direction of the cut.
• Use PPE—at the very least, safety glasses.
Now we can get started with the project. However, there are several things to do before we can begin making sawdust and noise.
If you’re just too excited about firing up the router and can’t wait, I understand, but please read through these steps first. Afterwards, feel free to practice some small shallow cuts on the edges of scrap wood before jumping into the project, using large enough pieces that can be secured to your work surface. This will give you a good idea of how the router feels and sounds when making a cut.
Step 1: First, all electronics and hardware should be removed from the guitar, to make sure we have plenty of room to operate the router without any obstacles. Take photos and draw diagrams now if you’re unfamiliar with guitar wiring, since you will probably have to disconnect the pickups and switch wires, and will definitely be connecting the new pickup. [Marshall provides instructions on this step in the video companion to this story on premierguitar.com, and StewMac has detailed wiring instructions on its website.]
Note that on this guitar, although the pickup selector switch is not in the way, I suggest removing the switch to keep the wires away from the router bit.
Step 2: Next, make sure the new pickup fits inside the template for the new pickup cavity. Make sure you have enough clearance to move the pickup through the template. It shouldn’t catch or rub on any part of the template.
Line up the template on the guitar body to determine where the new cavity will be. There are several techniques you could use here. Some might locate and mark the guitar’s center line, then line up the template that way, but since we are modifying an existing cavity we know is more or less centered, I suggest using that cavity as a guide and eyeballing it. Carefully.
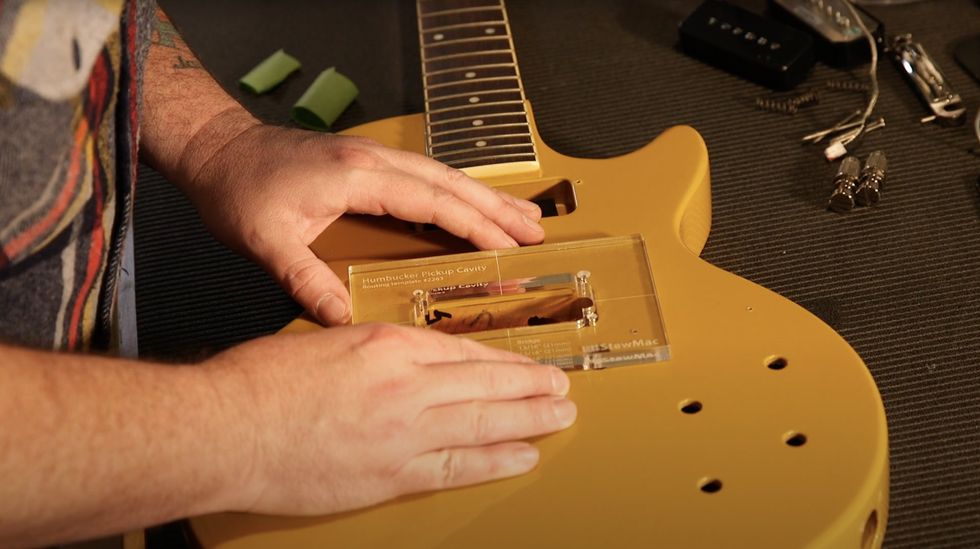
Since the StewMac template has a center line and other measures on its face, it’s easy to position over the cavity for the OEM pickup and decide which of its zones need routing.
Step 3: Now that you know where the template goes, attach the template to the guitar. I prefer using rolled up painter’s tape on the bottom side of the template because it holds fairly well (as long as you don’t use too much force with the router), it’s easy to remove, and relatively safe for modern finishes. Stronger double-sided adhesives work well but run the risk of damaging either the guitar or the template on removal.

After taping the template in place, Marshall uses the router bit to trace the path he’ll use, and to gauge the depth of the pickup cavity versus the location of the bit’s bearing.
Step 4: The template determines the shape of the new cavity, but the router itself determines the depth of the cut. Start by setting the depth so that the tip of the router bit is just barely touching the bottom of the cavity when the router is sitting on the template. Once the cut is made, we can double-check to make sure this depth works.
With the template secured and the depth of cut adjusted, I suggest trying a “dry run” of the cut to make sure the router moves freely around the template. Keep in mind the bit’s direction of rotation and plan moves that allow the bit to cut into the wood—but don’t do it yet. Just outline your moves. Make sure that the bearing on top of the router bit can freely follow the template, too. Setting the depth too shallow risks cutting your template, ruining both it and your guitar.
This seems like an excessive amount of preparation, but trust me, an hour of planning can prevent a minute-long job from destroying your guitar.
It’s almost time for the fun part. Don’t turn the router on yet. Put on your safety glasses and consider using ear protection if you are sensitive to high-pitched, loud sounds. This would also be a good time to make sure you have a shop vacuum handy, as you are about to make quite a mess.
Step 5: Now, it’s time to actually make the cut. Tilt the router slightly so that the bit is completely free before turning the router on. Keep in mind that the router should not be moved while the bit is accelerating or decelerating, so don’t make any cuts until the router is at full speed.

Once it’s at full speed, make the cut as practiced earlier. Take several shallow passes instead of trying to remove all the wood at once. There’s no need to force the router, you will hear and feel when the bit is cutting. Too much force may cause your template to move and ruin your cut, wreck the router bit, or potentially hurt you. And since the router spins the bit in a specific direction, be sure the cutting edge of the router is digging into the wood and that you move the router in the direction that puts the blade edge of the bit forward.
Now, you can turn the router off, but remember not to move it until the bit has completely stopped rotating. Check that the template has not been damaged, that the cut matches the template, and the pickup fits neatly inside.
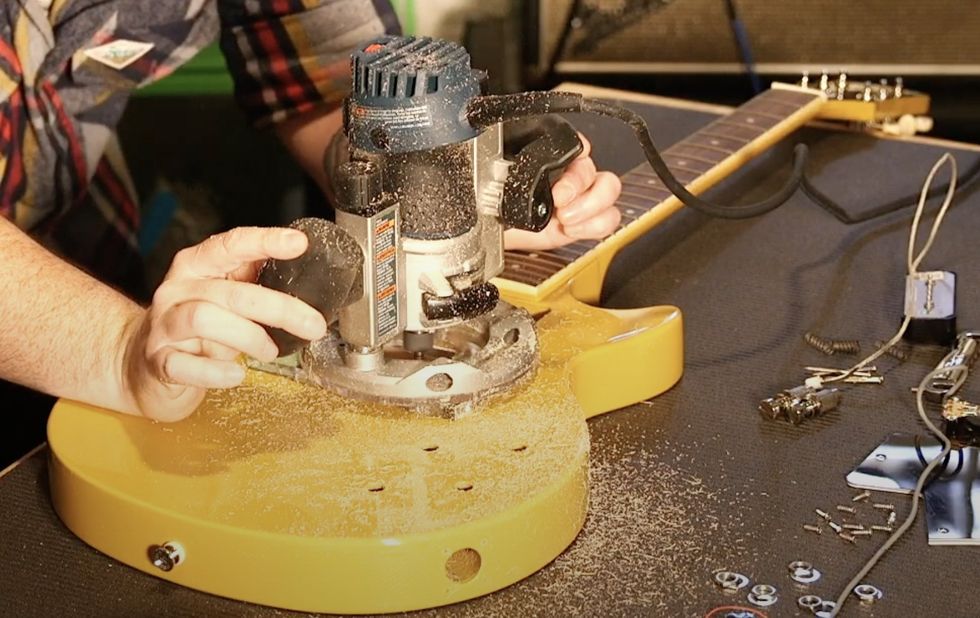
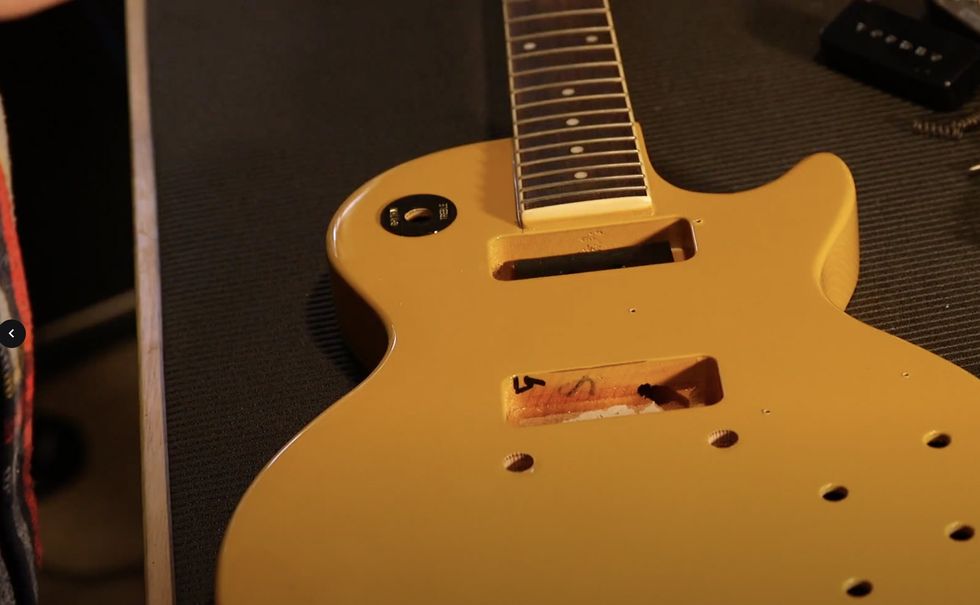
The sawdust flies as Marshall uses the router to slowly make gentle, shallow cuts, eventually reaching the cavity size required for the Parsons Street Humbucker.
Step 6: With this specific type of pickup, it turns out that we do need to make two slightly deeper cuts to accommodate the mounting screws and “ears” of the pickup base. You can do this by setting the bit to cut just a little deeper—in our case about 3/16" deeper—and cut only the areas around the pickup mounting screws. You could also do this with a hand drill or a drill press and a large spiral or Forstner bit, but I prefer the cleaner results from the router.

Checking the final cut to be sure there are no issues like snags or protrusions that would interfere with the fit of the pickup.
Step 7: Now, the new bridge pickup should fit. Test it by mounting the pickup in its ring and placing this assembly on the guitar. The mounting ring should sit on top of the guitar without having to force it down. If everything fits, go ahead and rewire and reassemble the guitar, then set it up to your liking. [We have a video at premierguitar.com called DIY: Easy 4-Step Guitar Setup.]
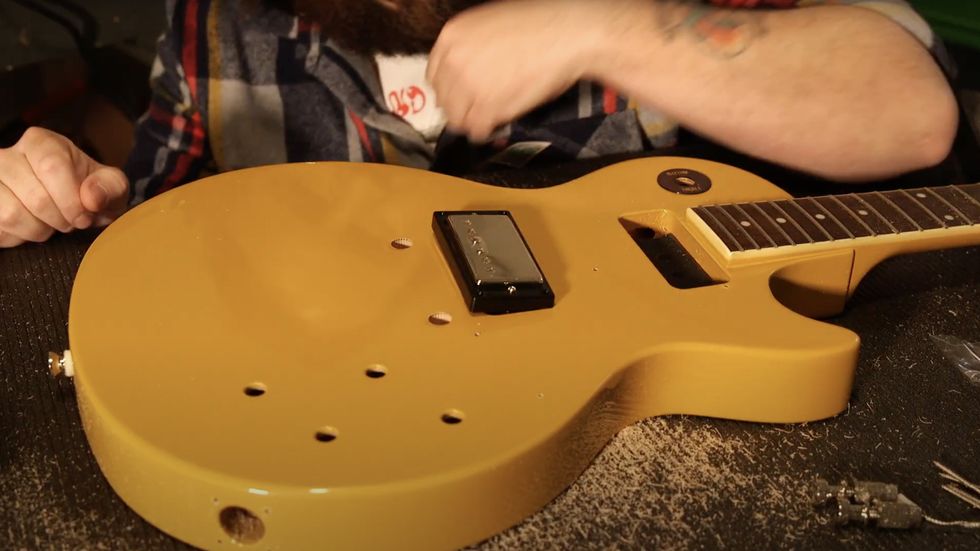
After placing the ring around the pickup, Marshall drops the humbucker and ring into place to test the fit. (As it turned out, a little bit of additional routing was required for the bottom of the cavity, to provide space for the humbucker’s left-side dog-ear mount.)
Step 8: On this Les Paul Special, since I’ve replaced the bridge P-90 with a bigger and more squared-off pickup mounting ring, the pickguard will have to be modified slightly to fit. I did this by tracing the pickguard onto a piece of paper, taping the tracing to the guitar, then marking the outline of the new pickup mounting ring. Now, I can use the tracing as a template and cut away the parts of the pickguard that I don’t need. I used a small bandsaw blade to cut away most of the material and slowly fine-tuned the edges with files and a small scraper until it fit.
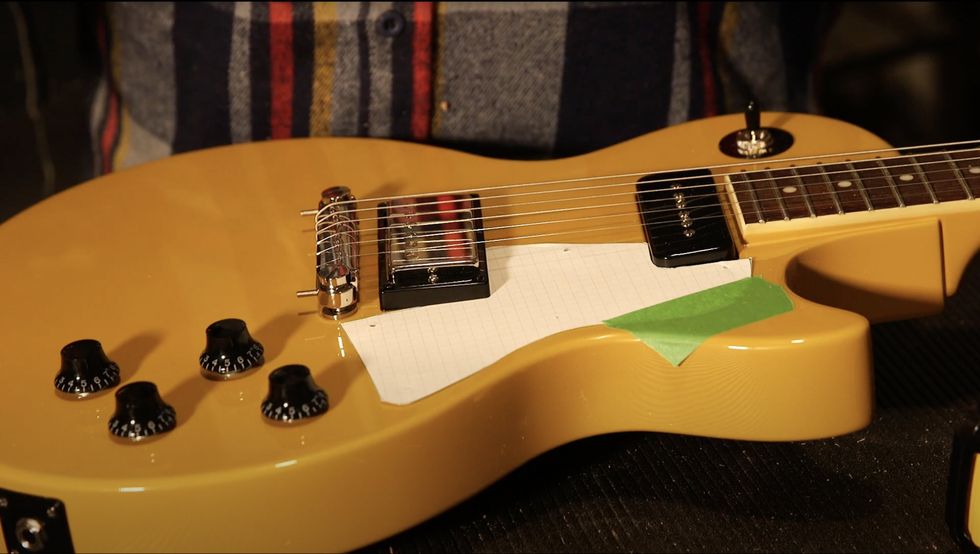
Here’s the paper template Marshall used to trace the new pickguard configuration required to accommodate the Parsons Street Humbucker. He then placed it atop the actual pickguard to make the cut.
I like to start with my bridge pickup very close to the strings, somewhere around 3/32" away from the treble strings and balancing the bass side of the pickup by ear. After that, I like to set the height of the neck pickup just by comparing the sound of each pickup, again, making sure that the output of each pickup is balanced from the bass side to the treble side.
To my ears, the humbucker we used in this guitar works very well paired with the stock P-90 in the neck position. It’s a medium output pickup, so it does have a bit more punch than the P-90 but doesn’t overpower it. Higher output humbuckers can roll off a bit of treble, depending on how they’re made, but this pickup has plenty of brightness for me. Both pickups together have abundant chime and sparkle. I really like this sound!
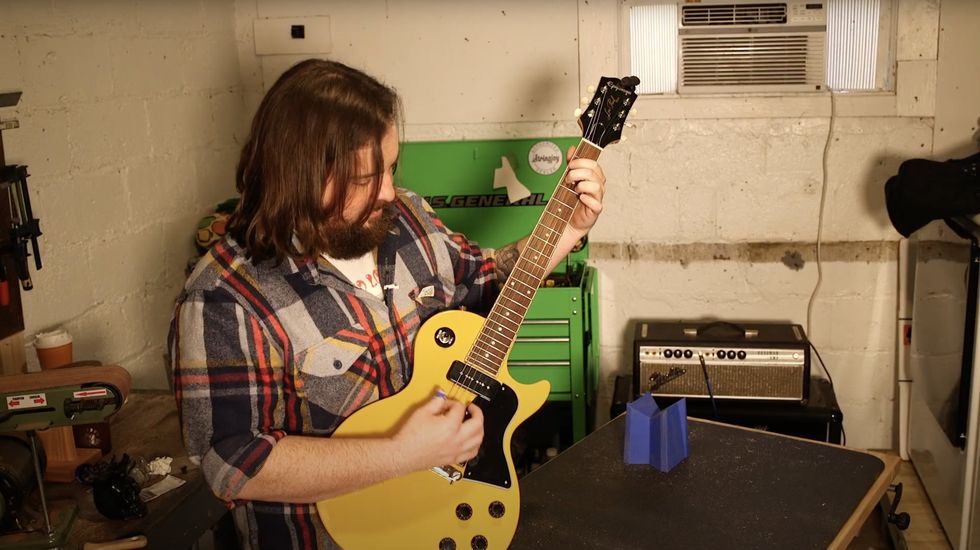
The proof is in the playing: Marshall tries out the Epiphone Les Paul Special’s new, combined humbucker-and-P-90 sound.
And on top of all that, I think this guitar looks really cool now as well. To me, that’s worth an afternoon’s work.
Learning to use a router is a great introduction to serious guitar modifications. It can be intimidating, but once you learn the basics, it opens up so many possibilities for modifications and repairs. Embrace the router!

Shop DIY tools and Supplies for your next guitar project: https://stewmac.sjv.io/qnPnag


This technique works for all standard single-coil pickups, including Fender’s template design, so dive in!
Why would you change wires on a pickup? Here’s a list of reasons I mostly hear in the shop when someone brings in a pickup for this operation:
1. A wire is broken and needs to be replaced.
This can happen if the wire was bent too much, or it was damaged with a soldering iron, a screw split it, etc.
2. A used pickup was bought on eBay or a similar marketplace and the wires are too short for your wiring.
Maybe one of the pre-owners snipped it out of the circuit at some point, rather than desoldering it to save the full wire length. The quick-and-dirty solution in such a case will be to extend the wire by soldering another piece of wire to it. For the “Trekkies” of us, that’s the way James T. Kirk and Scotty would fix it. Jean-Luc Picard and Geordi La Forge would solder a new wire with the correct length to the pickup to replace the old one. Make it so!
3. Changing the wires as a quality update.
Often cheap pickups have thin and shoddy plastic-coated wires that will likely break soon. It’s always a good investment regarding reliability and longevity to swap them with a good quality wire.
4. Changing the wires for tonal and/or aesthetic reasons.
Changing the wire material can alter the sound of a pickup, so replacing a cheap plastic-coated wire with a good-quality cloth-covered wire will not only look more vintage but will also result in a slightly warmer tone. Or the other way around for a slightly brighter tone. Or maybe you want to upgrade your pickups with a high-quality Teflon-coated or audiophile HiFi-wire. Perhaps you like to have neon green and pink wires on your pickups, for whatever reason.
5. Changing the wires for a shielded cable to add more shielding to the pickup.
This often goes hand in hand with shielding the complete single-coil pickup and is a logical step in such cases.
6. Changing the wires with NOS wire.
Often vintage pickups are modded with a non-original wire, sometimes as part of a repair. Bringing them back to factory specs is a good investment to keep the value of a vintage pickup alive.
Let's Begin
So, you see there are some good reasons to change the wires on a pickup. This list is not complete; for sure there are others.
Now, let’s start our project by preparing the pickup for this operation. It’s first and foremost important to protect the windings of your pickup against any damage. It only takes a fraction of a second to hit the winding with the tip of the soldering iron and this is a scenario you do not want.
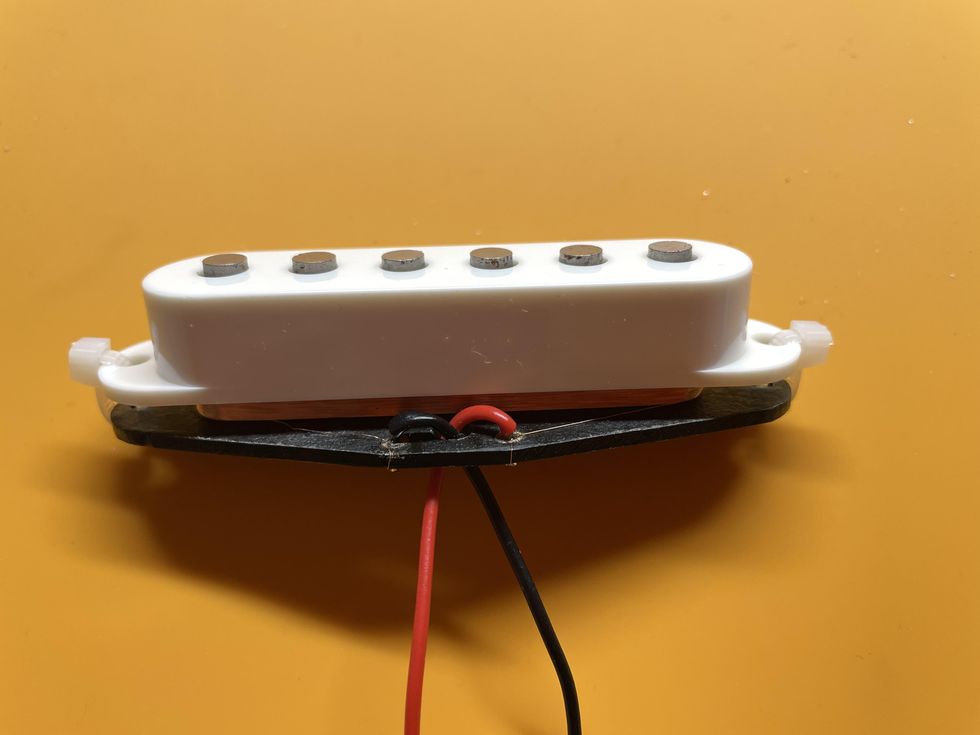
Photo 1
Courtesy of SINGLECOIL (www.singlecoil.com)
1. I simply put a standard plastic pickup cover on the pickup to protect the winding. I usually use two small zip ties to fasten the cover, but you can also use two small screws and a hex nut, a rubber band, or a piece of masking tape.
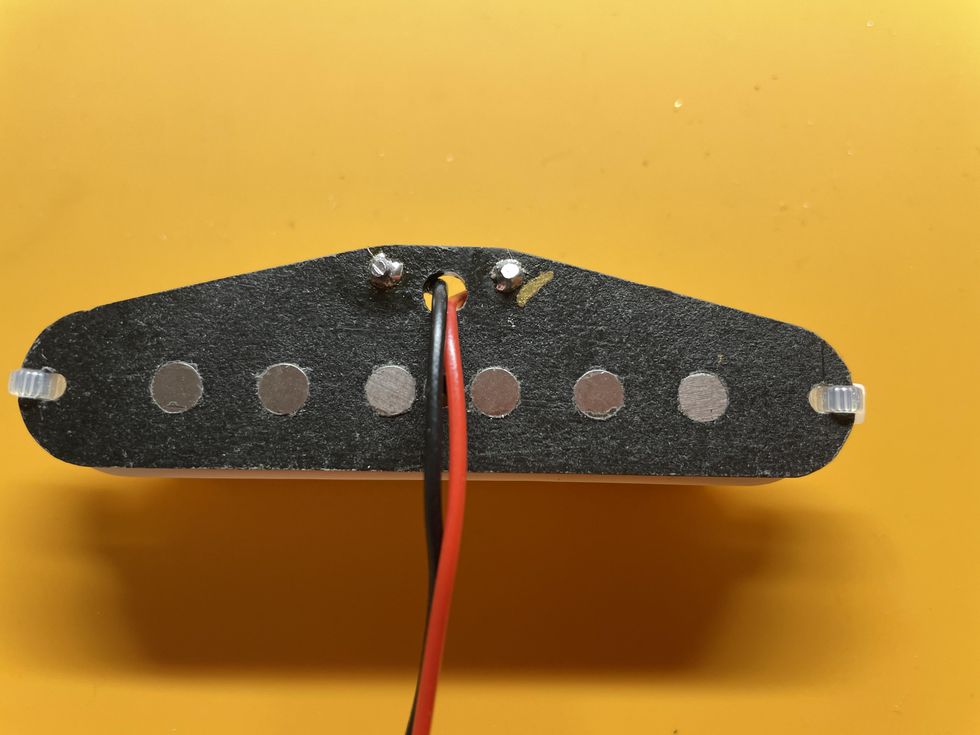
Photo 2
Courtesy of SINGLECOIL (www.singlecoil.com)
2. Have a look where the hot (usually white, yellow, or red) and the ground (usually black) wires are connected to the pickup and mark one of them. I always mark the hot connection by using a Sharpie, but you can also use a drop of nail polish, a small piece of masking tape ... be creative.
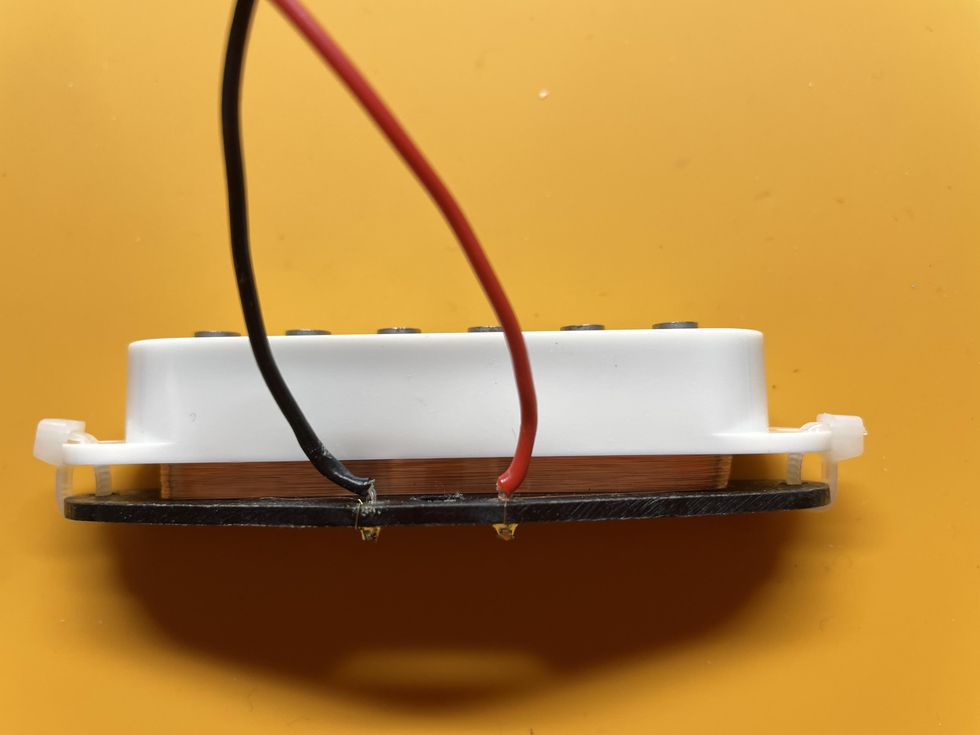
Photo 3
Courtesy of SINGLECOIL (www.singlecoil.com)
3. Measure the DCR (direct current resistance) of your pickup as a reference using your DMM (digital multimeter) and note it. After this is done, push the wires you want to replace upwards through the hole and pull them out, as shown in Photo 1, Photo 2, and Photo 3.
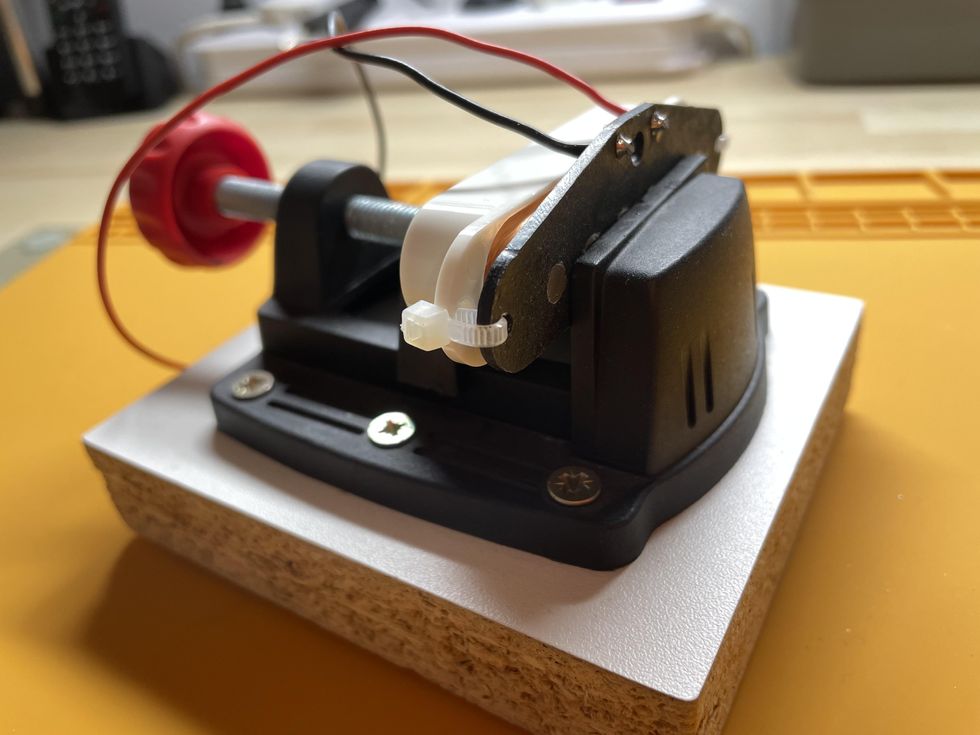
Photo 4
Courtesy of SINGLECOIL (www.singlecoil.com)
Now put the prepared pickup into a small vise and orient it so that you can look at the soldering terminals the two wires are connected to (Photo 4). Take care to not apply too much pressure with the vise: We only want to fasten the pickup, not break it.
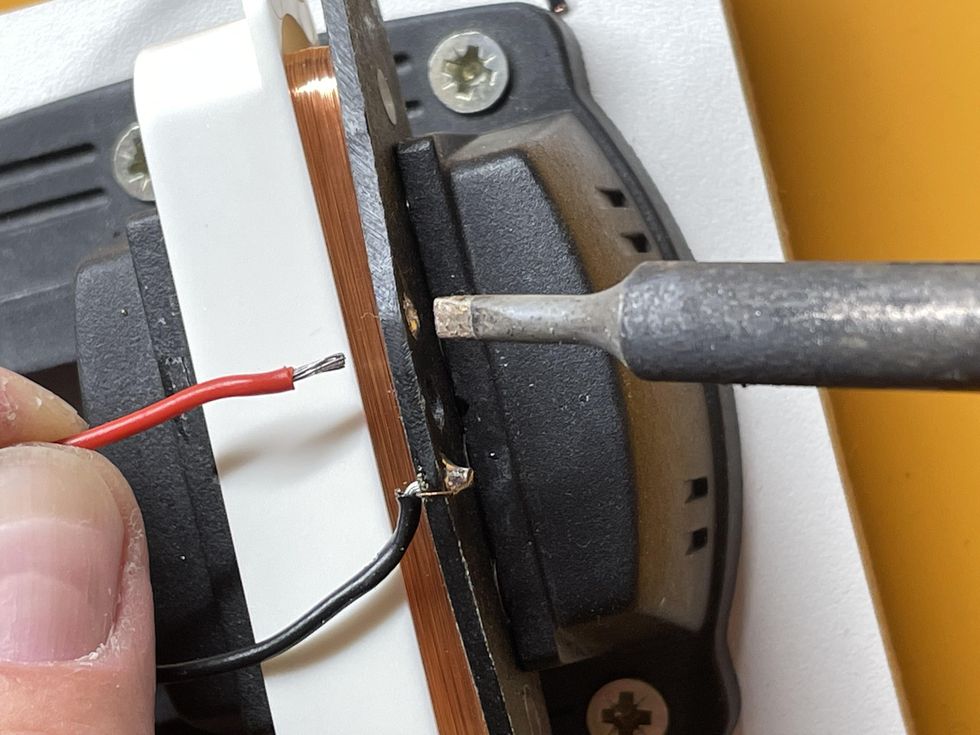
Photo 5
Courtesy of SINGLECOIL (www.singlecoil.com)
Pre-tin the tip of your soldering iron and heat up the soldering spot while gently pulling on the wire until it comes out (Photo 5). This should not take longer than 2 to 3 seconds. A small chisel-shaped soldering tip is my weapon of choice. Warning: Don’t touch the bobbin of the pickup with the soldering iron—it will melt. Repeat this procedure with the second wire.
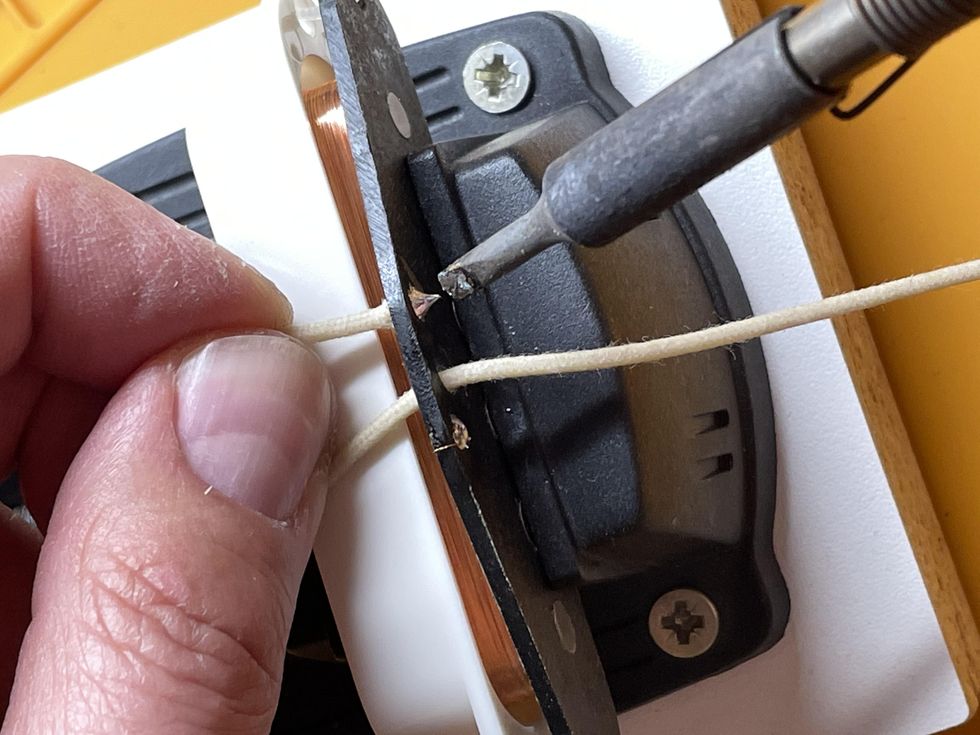
Photo 6
Courtesy of SINGLECOIL (www.singlecoil.com)
Strip the new wire, pre-tin it, pull it through the hole, and bend it so the stripped part will touch the soldering spot (Photo 6). I prefer to guide the wire with my hands, but you can also use tweezers for this. Now pre-tin the tip of your soldering iron and heat up the soldering spot while gently pushing the wire until it is in. This should not take longer than 2 to 3 seconds to perform. Repeat this procedure with the second wire. Cut off the excess wire with a small side cutter.
To check your work, measure the DCR of the pickup and compare it to the value you measured before. Small differences are okay and can be caused by the higher temperature directly after soldering to the pickup, or the new wires can be a different type and might have a different length. If you read zero or infinite, there is something wrong and you should check your soldering spots.
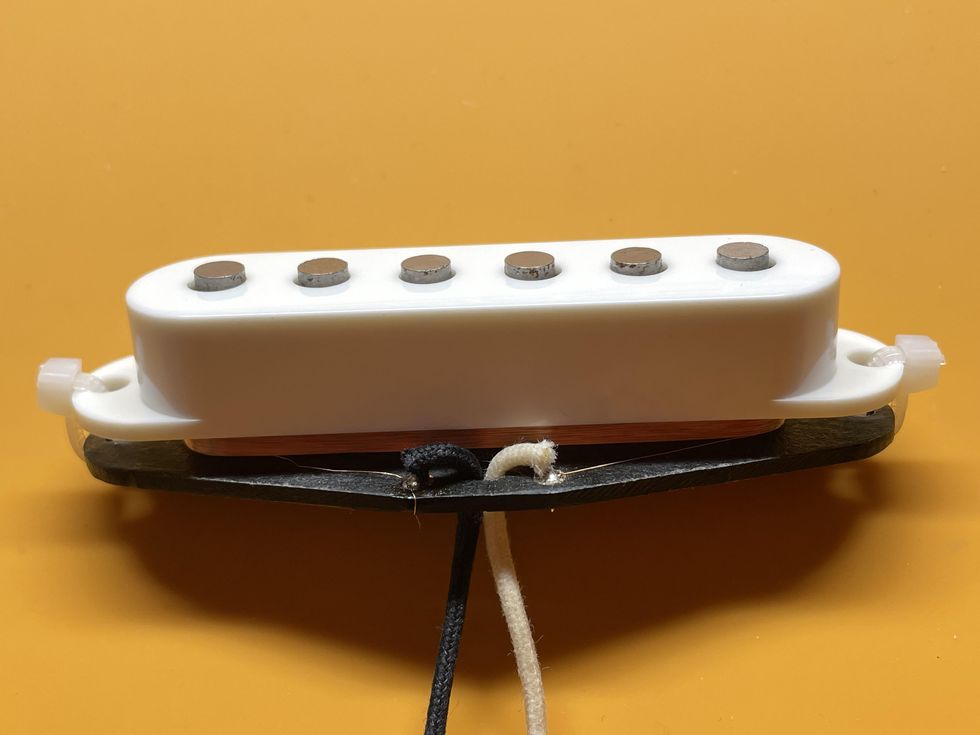
Photo 7
Courtesy of SINGLECOIL (www.singlecoil.com)
Take off the pickup cover you put on the pickup to protect the winding, and you are done (Photo 7). Congratulations! If you’re doing this regularly, you’ll become better and faster over time, so don’t worry if it takes longer than expected the first time.
Bonus: Staggering Pickup Wires
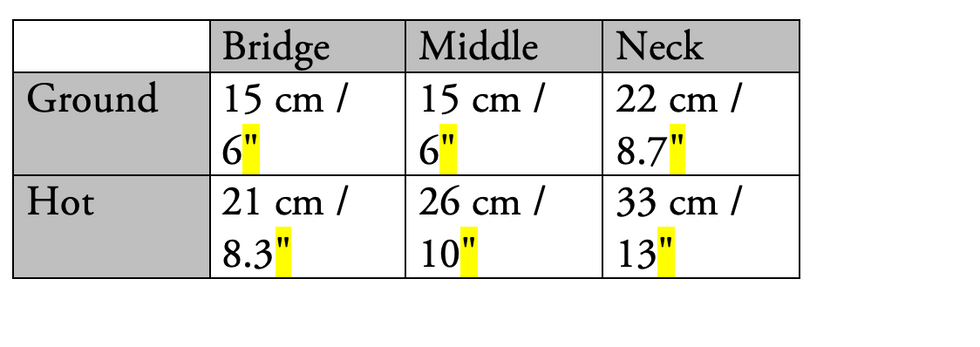
Staggering pickup wires is a neat trick to not waste any wire, which can be a real issue when using expensive audiophile wires. Pickup manufacturers usually apply the same wire length to all pickups, no matter if it’s a bridge, middle, or neck pickup. And they’re usually way too long, resulting in a good portion of obsolete, snipped off wires. To avoid this, you can add only the length of new wire you really need. Here are the values I use in the shop for a standard Stratocaster:
That’s it for this month. Next, we’ll continue with our guitar relic’ing project, so stay tuned. Until then ... keep on modding!
With a few tools, you can perform a handful of tasks that will make your new axe play better and stay in tune. This article is for folks who already know how to tighten loose parts, raise and lower string saddles or bridges, and adjust their truss rods—though I’ll share a tip on how to check it with even more accuracy.
Is that big bulky stock nut uncomfortable on your hand? Let’s trim it down and reshape it. If the action feels high and the neck looks straight, I’ll show you how to lower the action. And haven’t we all swapped out pickups and wondered, “Do they really sound better, or do I think that just because they’re new?” Before you swap your pickups, I’ll share some pickup-height measurements that might make you change your mind.
But wait! There’s more. With everything feeling and playing great, does moving into the upper register start to sound out of tune? Intonation is very easy to check and adjust. When you go to vibrato or hold a note, do the frets feel “sandy”? Are the fret ends rubbing against your hand while you play? Let’s flush and polish those up.
To be clear, we’re not swapping out anything on your new guitar: We’re simply refining the setup. Be sure to go online to see eight videos I made showing various processes covered in this story.
Begin the Beguine
There is an order of operations for best results. Neck relief is the first item to dial in, followed by getting the nut slots cut to the proper depth. After that, setting your string and pickup heights is in order. The final step is setting intonation.
Fret polishing is its own event and can happen anytime between string changes. Getting the frets feeling comfortable and well-polished will take some time and attention. You’ll also need some specialized tools as well as some that can be found in most households. Check the box for my list.
Tools You’ll Need
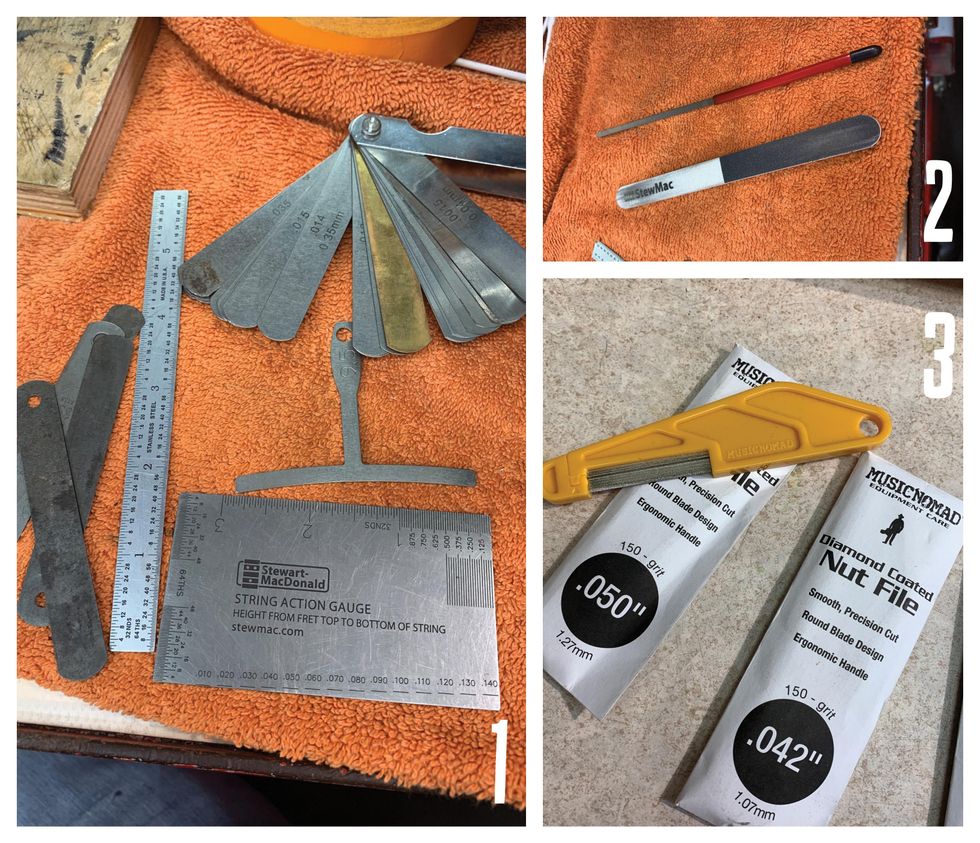
All of the specialized tools in this list are available through online suppliers, including StewMac and Amazon.
- 6" Ruler with measures in 64ths
- String action gauge [Photo 1]
- Miscellaneous screwdrivers
- Allen wrenches
- Radius blocks
- Understring radius gauges (with the radius on the bottom and the top)
- Fret-end dressing file
- Micro-Mesh sticks [Photo 2]
- Tape (low tack)
- Cotton swabs
- Paper towels (blue shop towels preferred)
- Clean cotton rags
- Nut files [Photo 3]
- Stikit sandpaper
- Tri-Flow lubricant
- Capo
- Feeler gauges
- Simichrome polish
Polishing the Frets
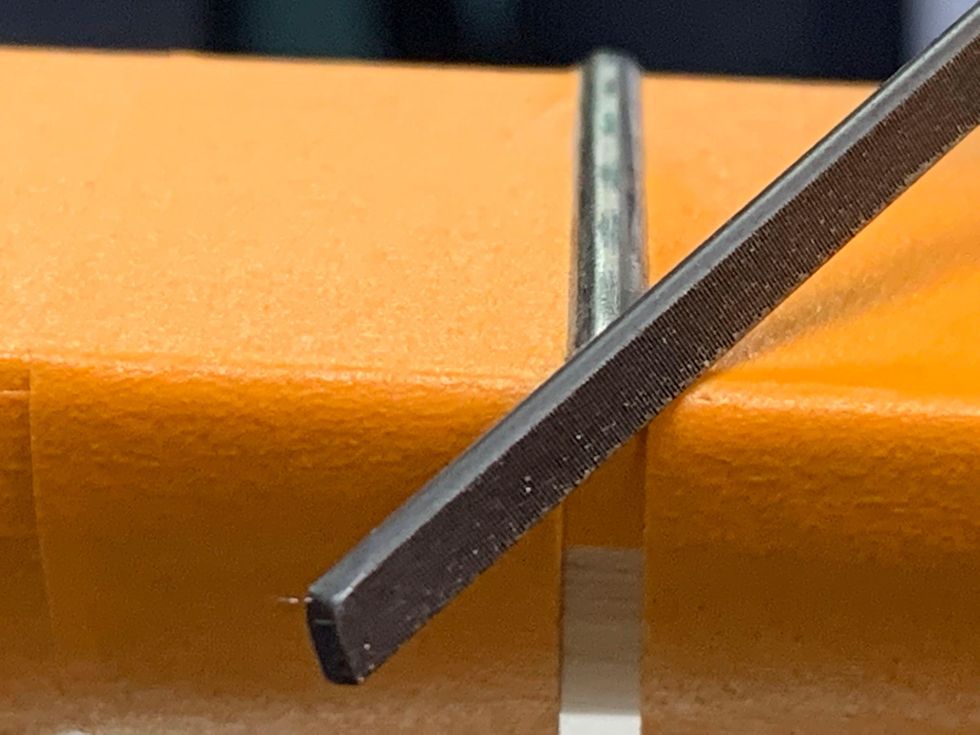
Photo 4
Let’s start with the most Zen of these tasks: fret polishing.
Tape off the fretboard using low-tack tape, exposing only the frets. De-tack each piece of tape on your clothing or maybe a rag—I use my jeans or my sweatshirt. Making it less sticky helps prevent pulling finish off a maple fretboard or the neck. Taping the fretboard also prevents putting any cross-grain scratches into it while you file and polish. You can choose to tape off the entire fretboard or work your way down one fret at a time. Dealer’s choice.
One thing to note about tape, any tape: Even when you de-tack it, you do not want to leave it on overnight. If that happens, rub the tape with your finger, which will break the surface tension. Then carefully pull the tape off from a corner, making sure you’re pulling it off at an angle and not at a straight line with the fretboard edge.
Every fret end has a small burr on the corner from the initial fret job. The fret-end dressing file has a non-marring smooth side for rounding the fret end, and a safe square edge for getting into the corner of the fret end. So, take the fret-end dressing file, use the squared off-side, and file both corners of the fret end [Photo 4].
How to Polish Frets
Here’s how easy it is to polish and smooth frets.
One or two strokes is all you’ll need. Then, using the non-marring side of the file, slightly round off the fret ends.
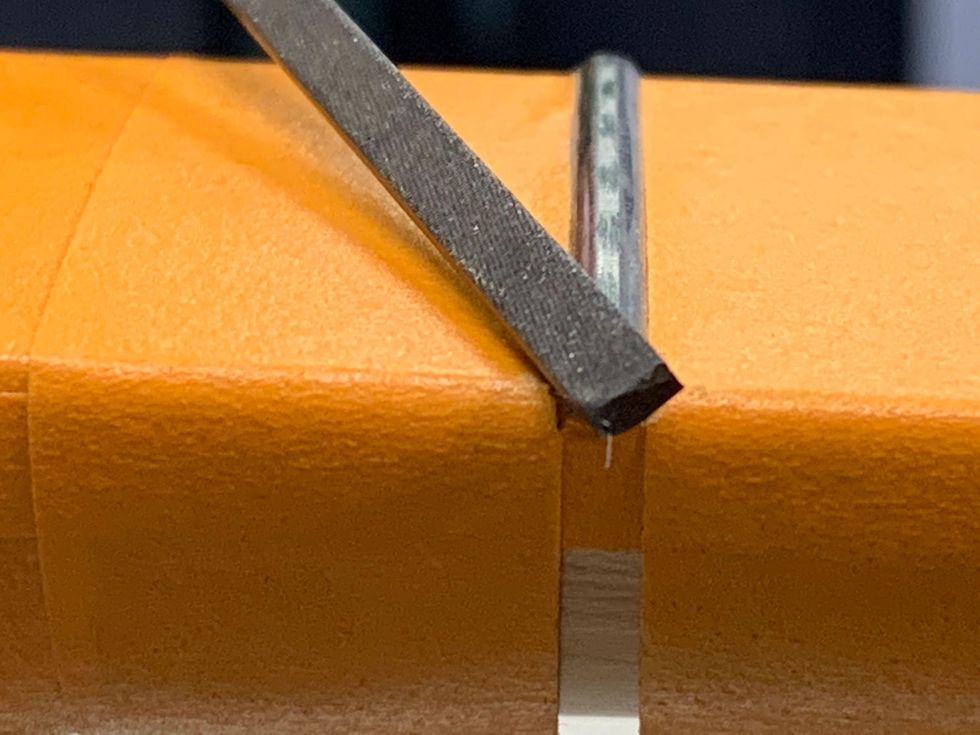
Photo 5
With the file positioned vertically, file downward to make the fret end flush with the edge of the fretboard.
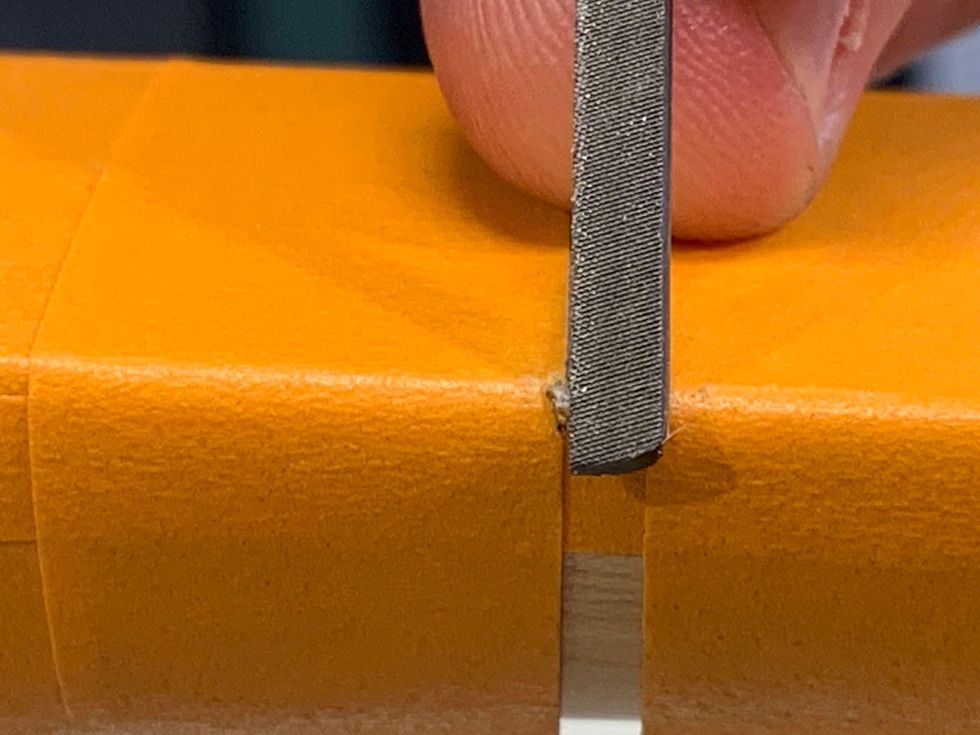
Photo 6
For a nice, rounded-off look, polish the frets using the same rounding motion from the previous step, working through all three grits of the Micro-Mesh stick.
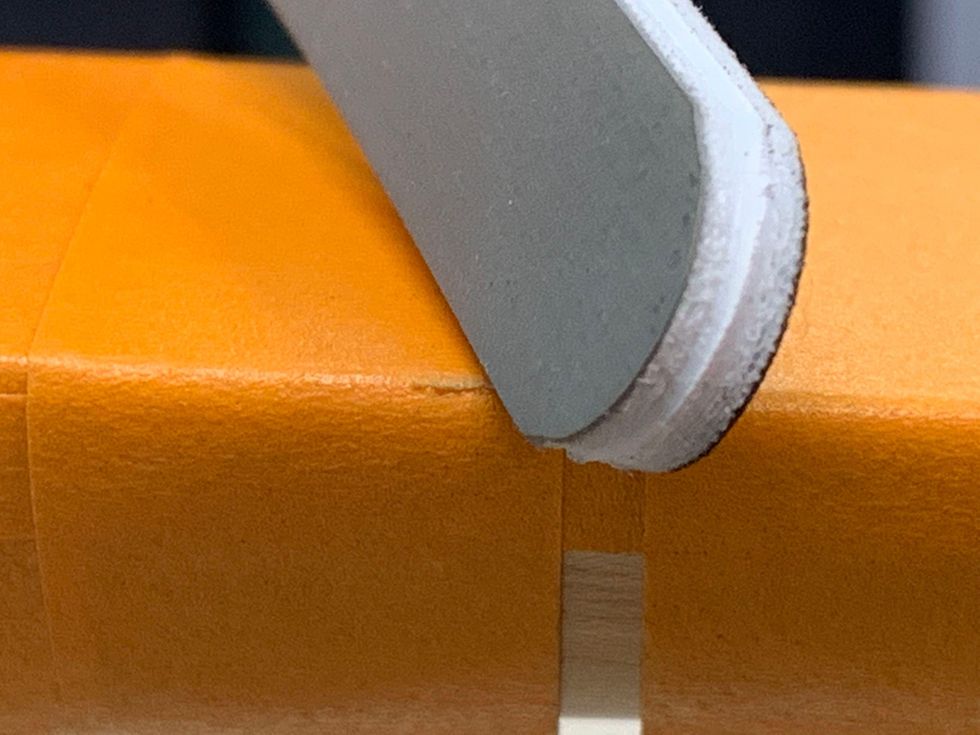
Photo 7
Then, polish both the sides and the top of the frets.
Photos 8 (top) & 9 (bottom)
Using a soft cloth and Simichrome, buff every fret. This will give you a great shine and help prevent oxidation. Now it’s time to remove the tape and condition the fingerboard if it needs it.
Note: Every fret has two fret ends to clean up and polish along with the fret itself. This is a fair amount of handwork. If you’ve never done it, you will get tired and need a break. Take that break. Take multiple breaks. Let the process take however long it requires without rushing. If you’re new, do all the fret polishing over a weekend or a few days. It should be fun, not painful. If it is difficult, call your local luthier and hire them to do it for you.
Adjusting Neck Relief

Photo 10
Neck relief refers to the slight amount of concave bowing intentionally created in the neck of a guitar or bass by adjusting the truss rod. For the safety of the guitar, be sure to slack the strings before doing any adjustments to the truss rod. Neither you nor your guitar needs to be tense during this process.
Before whipping out an Allen wrench for the truss rod, start by sight-checking the neck’s straightness. You can sight the neck with the guitar on its back, but I like to put it on edge and look at it that way. It’s easier to see how much curve there is when the guitar is on its side. I feel like gravity plays tricks on my eyes when I sight the neck with the guitar on its back. When I play the guitar, it’s on its side anyway, so looking at it from this vantage point is best.
Tune the guitar to pitch, put a capo on the first fret, and press fret 15 with your left hand.
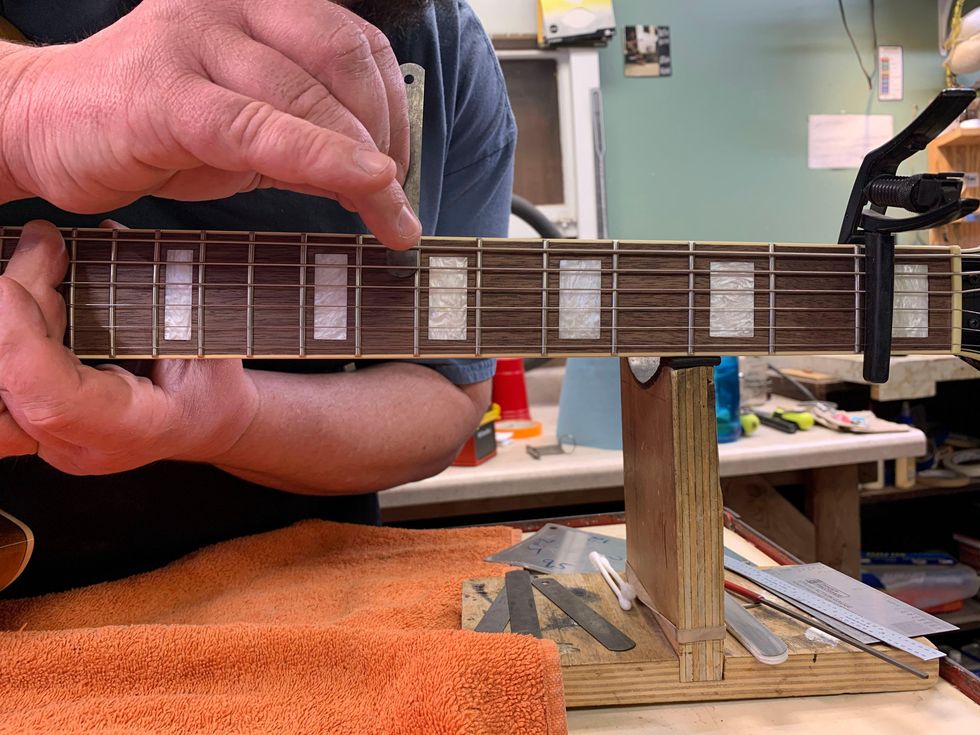
Photo 11
With your right hand, take a feeler gauge and check the gap at frets 7 through 9 (left-handed players, flip your hands around) [Photo 11].
From the top of the fret to the bottom of the string, the gap is usually anywhere from .003" to .012", depending on the feel you are going for. The feeler gauge should fit just between the top of the fret and the bottom of the string. The string shouldn’t move. This will tell you how much “relief” is in the neck. If you find this challenging, keep going—this will take some practice.
When dialing in the relief, I go back and forth between adjusting the truss rod and the string action. Getting the strings low and playing clean on a budget axe can be a challenge. Usually the fretwork isn’t that great, and in the upper register the frets can be unlevel, causing buzzes and clanks. If you need to raise the string action to get the notes to play clean, some fret leveling may be in order. (For more on fret leveling, go online to our article “About Fret Leveling,” from the December 2007 issue.) For good energy transfer, the neck should be as straight as possible. If the neck is straight and the frets are not level, the strings will buzz with low action.
In general, the flatter the radius on the fretboard, the straighter you can get the neck with the truss rod adjustment. On a fretboard with a 12" radius, you should be able to get .005" relief, and on a vintage 7.25" radius board you may need as much as .014" relief. The only way to get better at checking and setting relief is practice.
Refining the Nut
String buzzes, pinging noises when you tune, strings sticking in the slots, and too much string motion in the nut slots are all indicators of trouble. Before getting out the sandpaper and Micro-Mesh sticks, be sure you know if your guitar’s nut is TUSQ or bone. TUSQ is softer, so you should leave TUSQ nut slots a little higher. This leaves room for the TUSQ to wear without causing buzzing on the first fret. With bone, you can cut the slots lower, because it holds up to string wear.
How to Shape Your Guitar's Nut
Watch as Dave Helmer sands down the back half of a nut and creates a smooth finish.
The back side of the nut is usually very bulky and could often stand to lose some material to be more comfortable on your hand. So, let’s start there. Tape off the neck and headstock around the nut using a few layers of tape to protect the headstock face and fretboard. Then, slack the strings and pull them to either side of the nut.
Sand a bevel into the backside—the side closest to the headstock—of the nut using P320 and P400 grit Stikit sandpaper on a flat sanding stick.
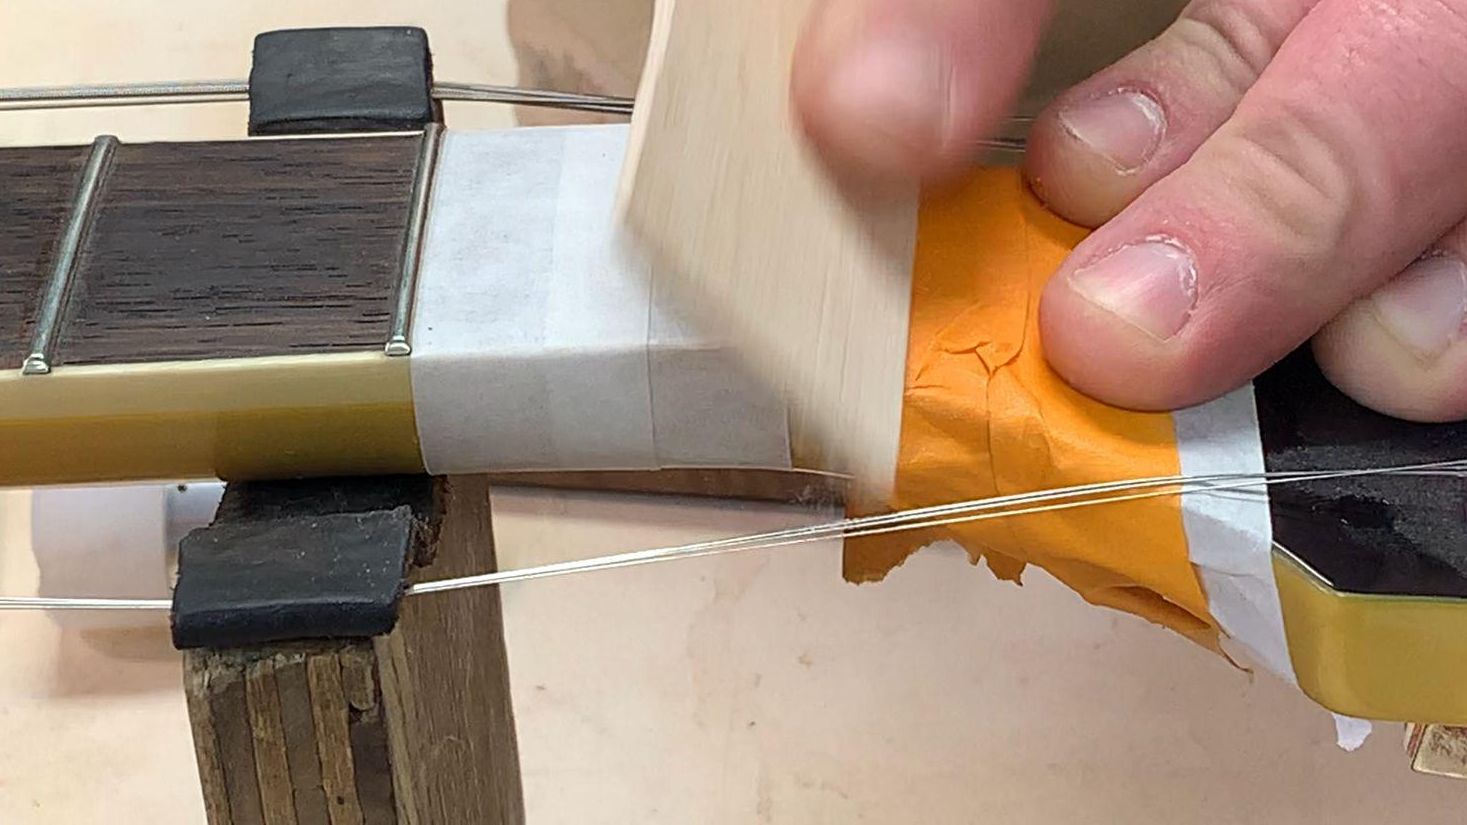
Photo 12
The bevel should start at the back of the nut and come forward about one-third to one-half the thickness of the nut [Photo 12]. Use P320 for most of the sanding and switch to P400 for the last 5 to 10 strokes.
Next, take a fresh Micro-Mesh stick and work through the various grits to buff/round over the bevel you’ve sanded into back of the nut, so it looks and feels good.

Photo 13
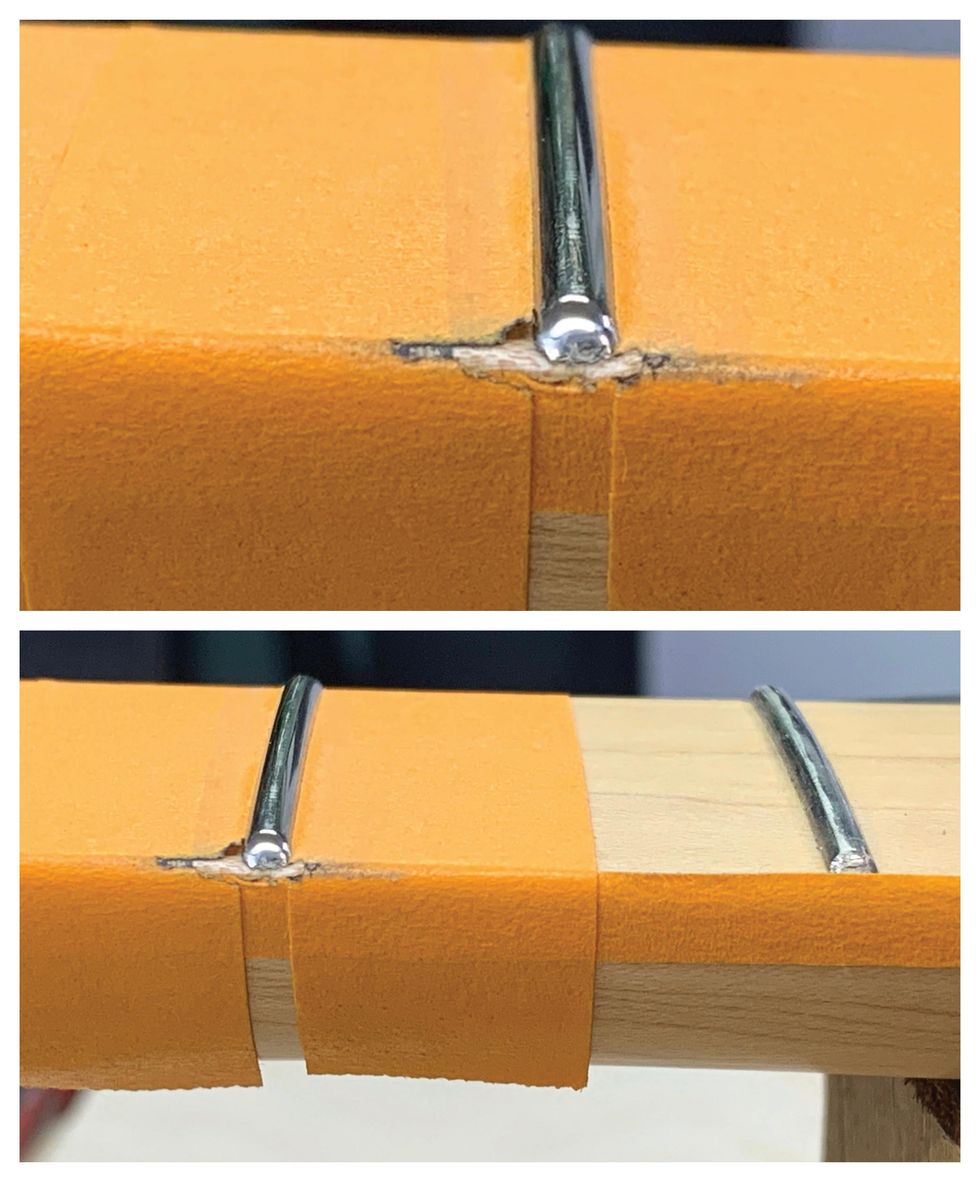
TUSQ nuts are often tall, and the strings sit deep in the slots.

Photos 14 (left) & 15 (right)
Wound strings require 50 percent of the diameter of the string to sit in the nut slot, with the other 50 percent above the top of the nut surface. The plain strings should be flush with the top of the nut. Take a look at the wrong appearance [Photo 14] and the correct look [Photo 15] for properly seated strings.
How to Sand Your Guitar's Nut
Our luthier shows you how to use a radius block and sand down a nut.
Use a radius block that matches the radius of your fretboard.
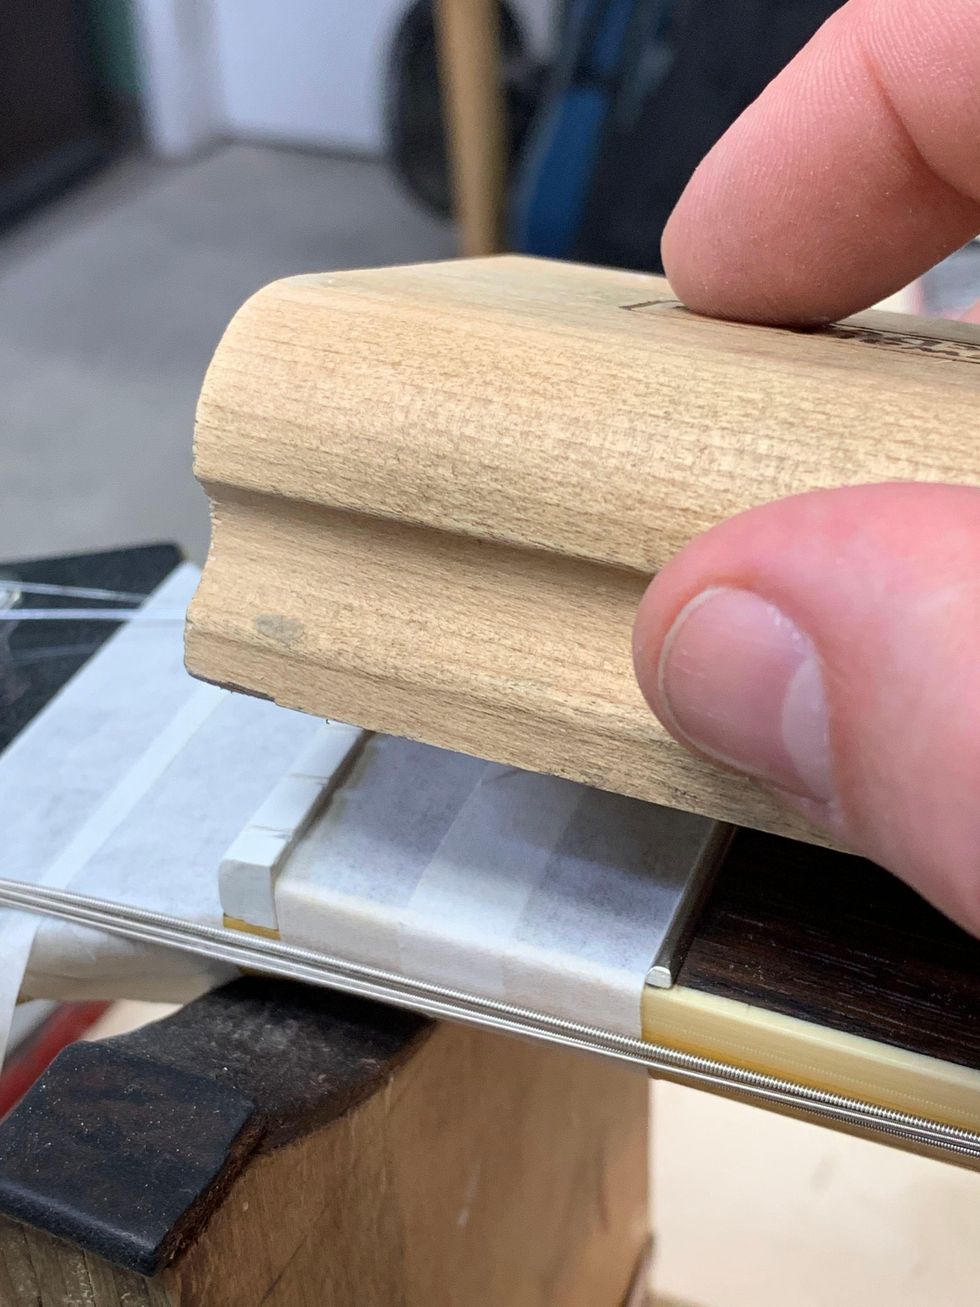
Photo 16
With P320 and P400 grit Stikit sandpapers, use mild pressure to sand down the top of the nut. Sand a bit and check your progress by setting the strings in the slots and putting a little tension on them. Tuning to pitch isn’t necessary. Use the P320 for most of the sanding, and switch to P400 when you are close to the 50/50 height for the wound strings. The radius block sanding will leave a flat, sharp edge on each side of the TUSQ nut [Photo 16]. To round over the sharp edge, use the sanding block and Micro-Mesh stick.
Use the coarse grit of a Micro-Mesh stick to round over and blend the bevel from the back into the top of the nut. Work through the grit gauges until it’s smooth. There is a fine balance between the bevel at the back of the nut and the top radius of the nut. Go back and forth between the two steps to get a nice, finished look and a nut that functions at optimal levels.
… And Refining the Nut Slots
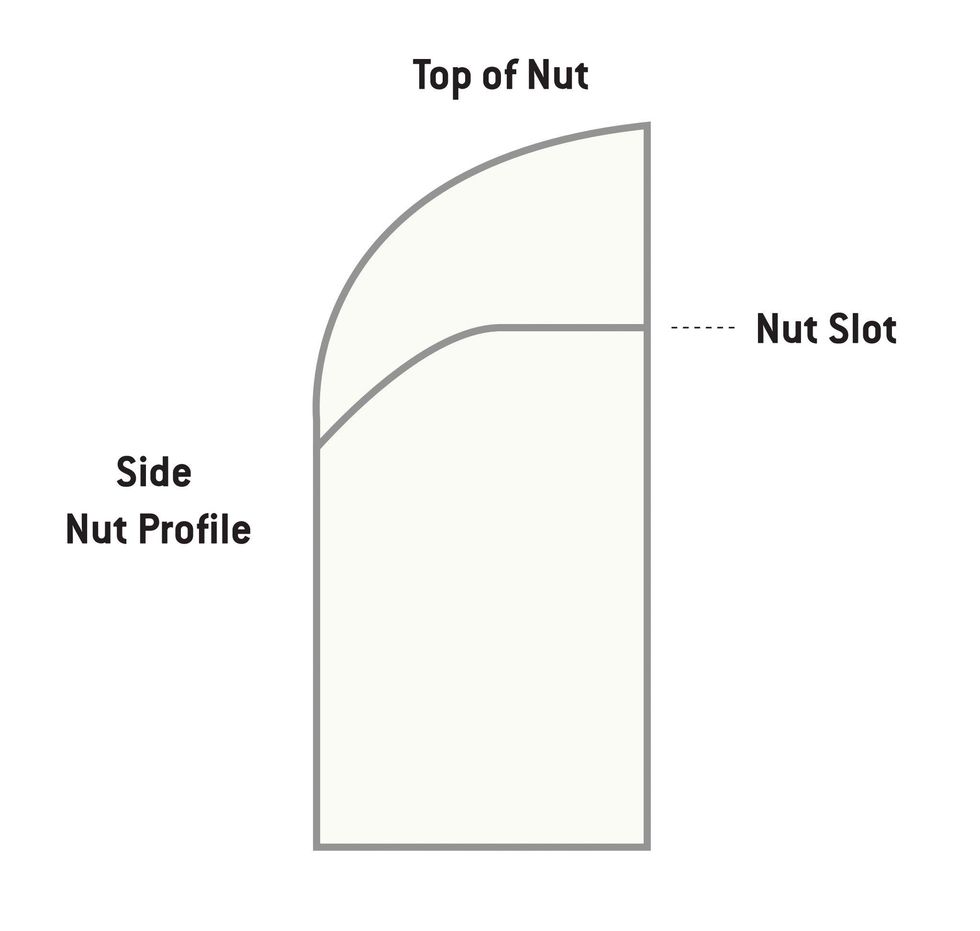
Photo 17
Nut height is the distance from the top of the first fret to the bottom of the string. A good height on the wound strings is about .020", and for the plain strings about .015". Measuring this gap with a feeler gauge can be tricky because of the fretboard radius. Many repair folks do this by eye and feel, based on experience. It takes some practice. A good check: At pitch, fret the third fret and check for a small gap between the string and the top of the first fret.
How to Widen Your Guitar's Nut Slots
A diamond file can make quick work of deepening and widening nut slots.
The bottom of the string should be sitting on the bottom of the front half of the nut slot [Photo 17]. File down each nut slot to its proper depth using the corresponding nut file. There are diamond nut files on the market in multiple sizes to accommodate many string gauges. Make sure to keep your strokes straight. The standard-toothed files have less sizes and usually require rolling them from side to side to get a well-fit string.
Next, using a proper-sized file, round over the bottom back half of the nut slots down, toward the face of the headstock and away from the strings. This will allow the strings to move freely during tuning or bending, while still having support from the front half of the slot.
How to File D and G String Slots on Guitar
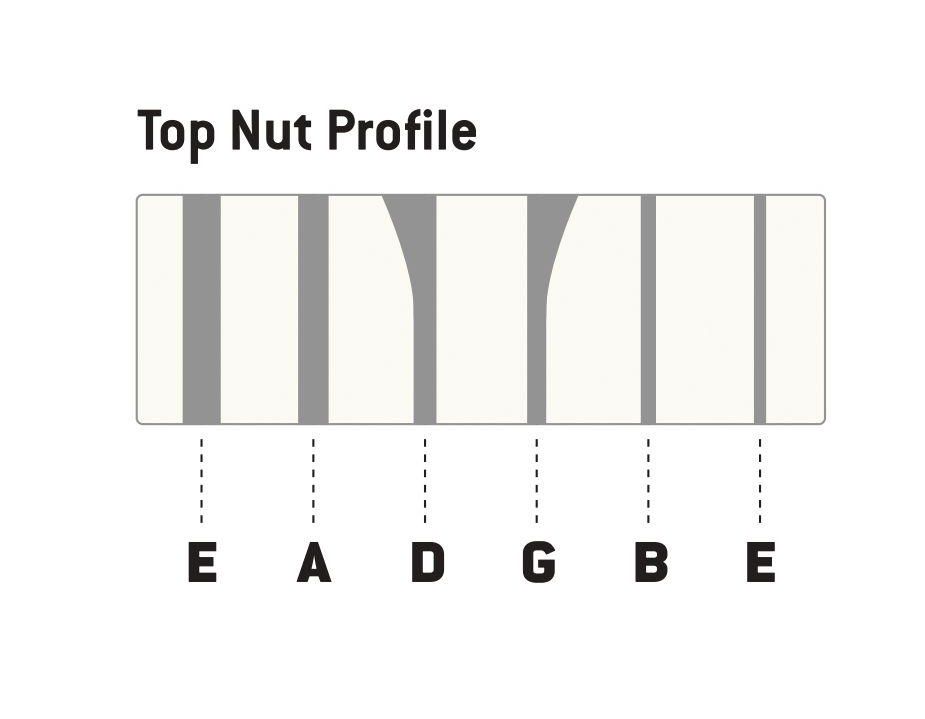
Photo 18
On guitars with 3x3 headstock configurations, the D and G strings need the back half of the slots feathered out away from the center, so the string has a direct path to the tuner post. Using a file that is one size bigger than the string and rolling it side to side on the back of the nut slot will give the string a straight path to the tuner post. Photo 18 is my illustration showing which slots need feathering.
Watch How to File D and G String Slots on Guitar
The D and G nut slots require special attention on 3x3-style headstock configurations.
Additionally, use pencil lead to lubricate the slots. Just get in there with the point of a pencil and mark the slot with its graphite. You might also put a drop of Tri-Flow on the front of the string tree. Tri-Flow will run down the string, so take a cotton swab or cloth to clean up any excess. Tri-Flow has Teflon in it, so you don’t need much.
Adjusting String Action
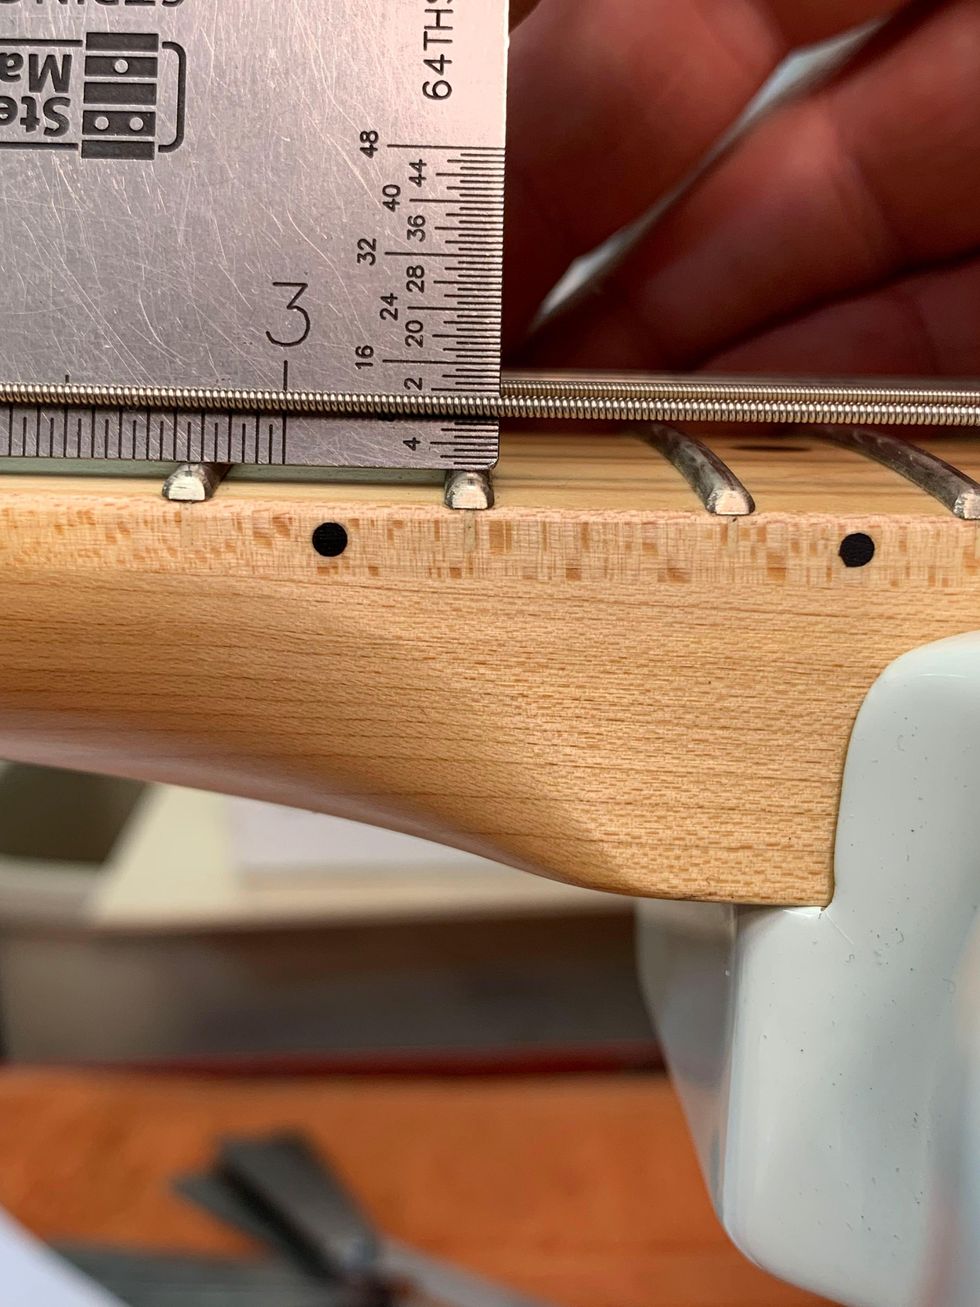
Photo 19
First, find your string height by measuring the string action at the 17th fret on a Fender-style guitar and at the 15th fret on a Gibson-style instrument.On electric guitars, action can range from 3/64" to 3/32", depending on the player’s comfort. My preferences are 1/16" on the treble side and 5/64"on the bass side on both Fender- and Gibson-style guitars measured at the appropriate fret.
How to Adjust Guitar Action
Here’s a look at how our author adjusts the action.
Always loosen the string tension before making action adjustments. This will save wear and tear on the small bridge components. Take either a 6" ruler or a string action gauge and set it on the frets. Measure from the top of the fret to the bottom of the string [Photo 19].
If the action is high, you will lower that string’s saddle or that side of the bridge. If it is low, you will raise it. Make sure the individual saddles are sitting square and upright to the face of the bridge. You do not want them sitting at an angle or leaning over. This will cause buzzing.
The bottom of the strings should match the radius of the fretboard when measured with an understring radius gauge.
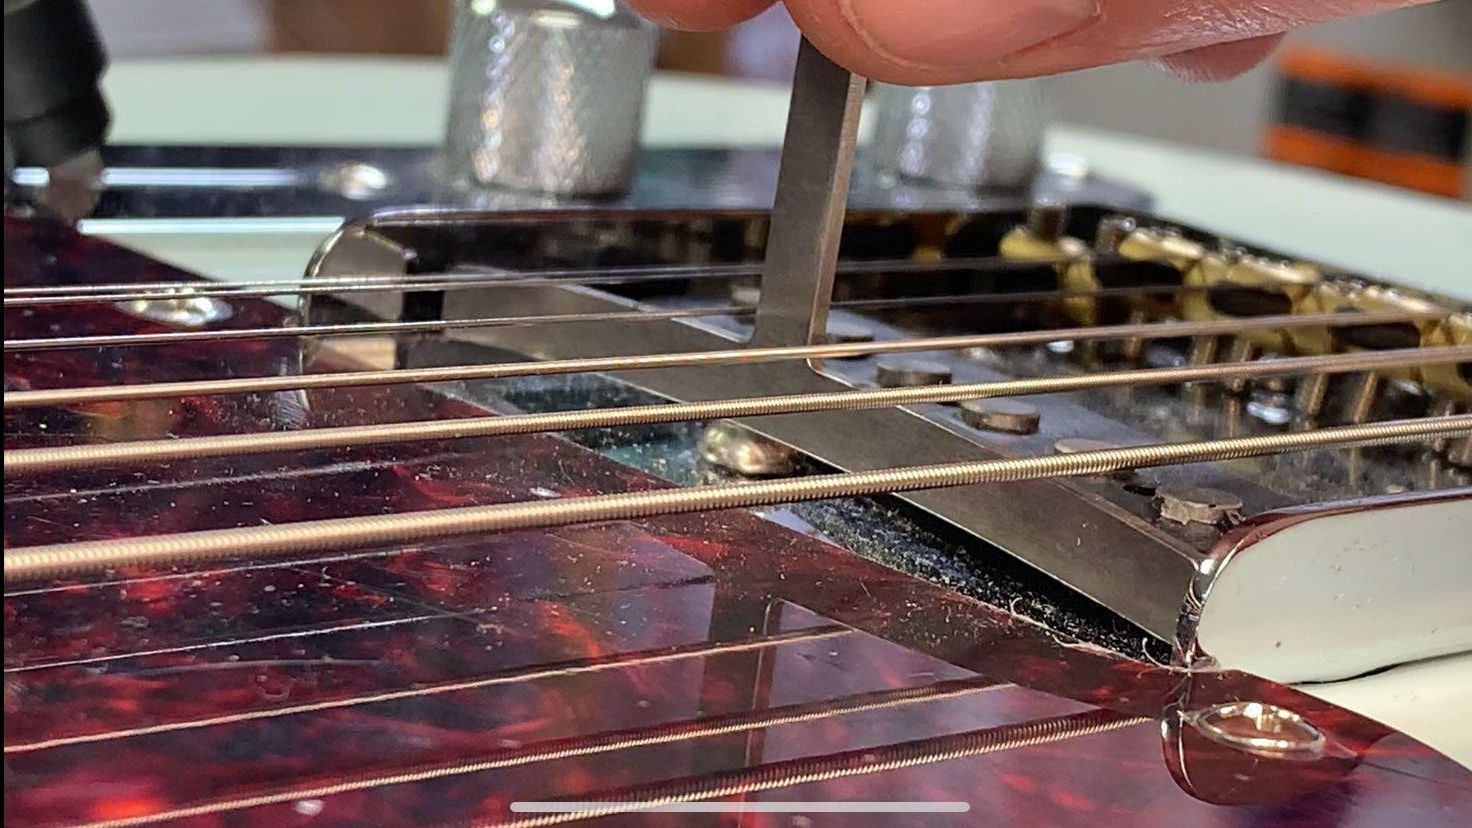
Photo 20
Start your adjustment with the outside strings, working toward the center. On Fender-style guitars, set the two outside strings to the height you want and have the middle four strings a bit higher than that. Bring the gauge up from underneath and just touch the two outside strings. Then, bring the strings down a little at a time until the radius matches.
On a Gibson-style Tune-o-matic, the saddles are not individually adjustable. So, if the radius doesn’t match, the saddles will need to be filed. To do this, I recommend using toothed nut files and a rolling side-to-side motion. Do a little work and check your progress. Remember to slack your strings when adjusting the saddle or bridge up or down.
Changing Pickup Height

Photo 21
Finally, let’s take a look at pickup-height adjustment. First, to check pickup height, use the two outside strings again. Press the top wound string on the last fret and measure the distance from the top of the pole piece to the bottom of the string [Photo 21]. This distance can range from 3/64" to 1/8". My preferences are 1/16" on the treble side and 5/64" on the bass side.
Adjusting Guitar Pickup Height
Dave Helmer walks you through the process of adjusting the height of your guitar’s pickups.
On most styles of pickups, there are height adjustment screws on either side of the pickup to raise or lower it. The closer the pickup gets to the strings, the more present string frequencies become. If you get too close, the magnetic pull can affect the string’s vibration and you may hear some strange sounds as you go into the upper register.
On Strats, the neck pickup is regularly set too close, and at the 12th fret and above, the low E and A can sound choked, honky, and not clear. Lowering the neck pickup with a screwdriver usually solves this issue.
Setting Intonation
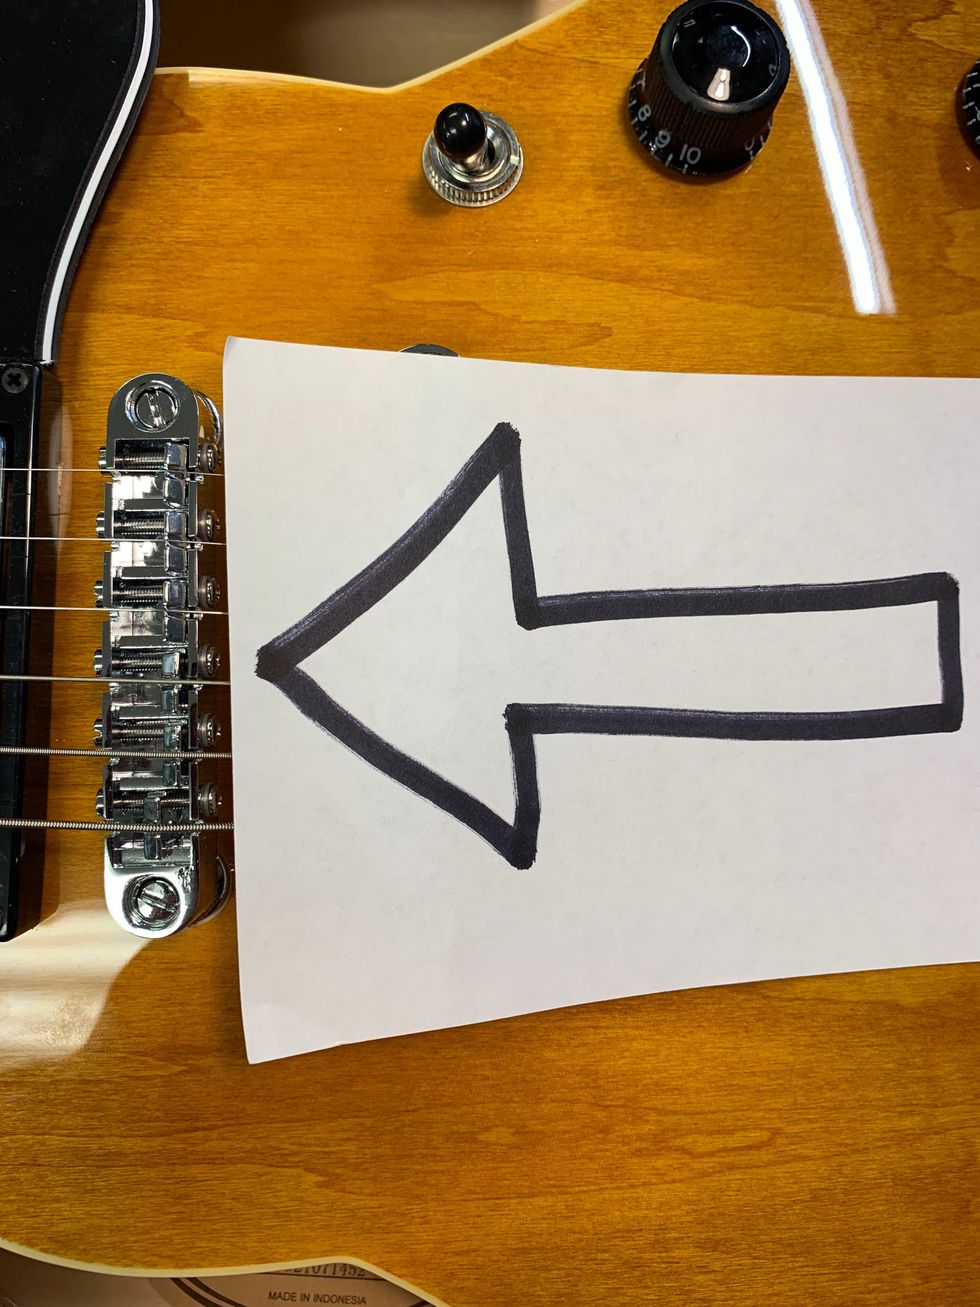
Photo 22
If you can’t get your guitar accurately in tune, you might need to check its intonation. Adjust all saddles as far back as possible so every string will play flat at the 12th fret. You will adjust the saddles forward, gradually making the octave play sharper until it’s in tune with the open string [Photo 22].
Adjust Your Guitar's Intonation
With a tuner and a screwdriver, Dave Helmer shows you how to adjust your guitar’s intonation.
Depending on your vibrato style, experiment with intonating the plain strings slightly flat. Use your ear and do what sounds good. Sometimes, the plain strings can have perfect intonation, but playing with vibrato can make them sound sharp.
To fine-tune intonation, the individual bridge saddles must be adjustable. Once the intonation is set, recheck the string radius using the understring radius gauge and adjust as needed. The radius can change as the saddles come forward during intonation.
Tri-Flow is great for lubricating saddle parts. Put a small drop on the saddle-height adjustment screws and capillary action will suck it in. Adjust the saddle up and down a few times to coat the threads. Clean up any excess with a cotton swab or cloth. Put a drop or two onto a cotton swab and apply the Tri-Flow to the top of each saddle where the string rests. This will help strings move freely during tuning and after any bends or vibrato.
And that’s it! For a relatively small investment in tools and time, you’re now ready to supercharge your new guitar—and maybe your long-treasured axes, too.